Monday, January 28, 2019

Activate window 10 through Command prompt


Window 10 Enterprise : Manual Activating 


To Launch Command Prompt as Administrator:

1. Click the Windows 10 Start Menu (hitting the Windows key on the keyboard if not already there).  
2. Type cmd on the keyboard which will bring up the Windows 10 search.
Command Prompt highlighted in the Windows Menu at the left side of the screen.

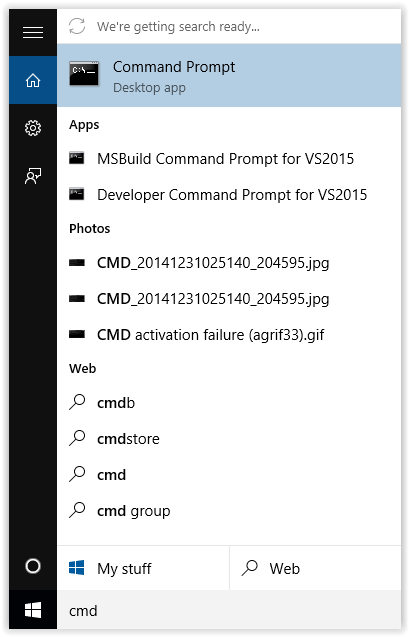
3. Right-click on the Command Prompt app. 
Command prompt option highlighted

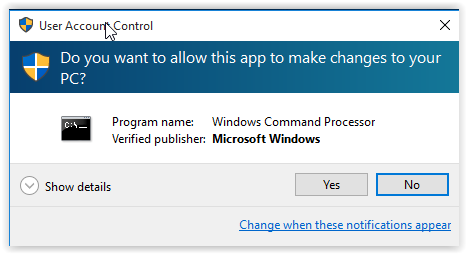
4. Click the Run as administrator button at the top of the screen.
Run as administrator button.

5. Click Yes if the Windows 10 UAC prompt is displayed.
Yes highlighted in the UAC window

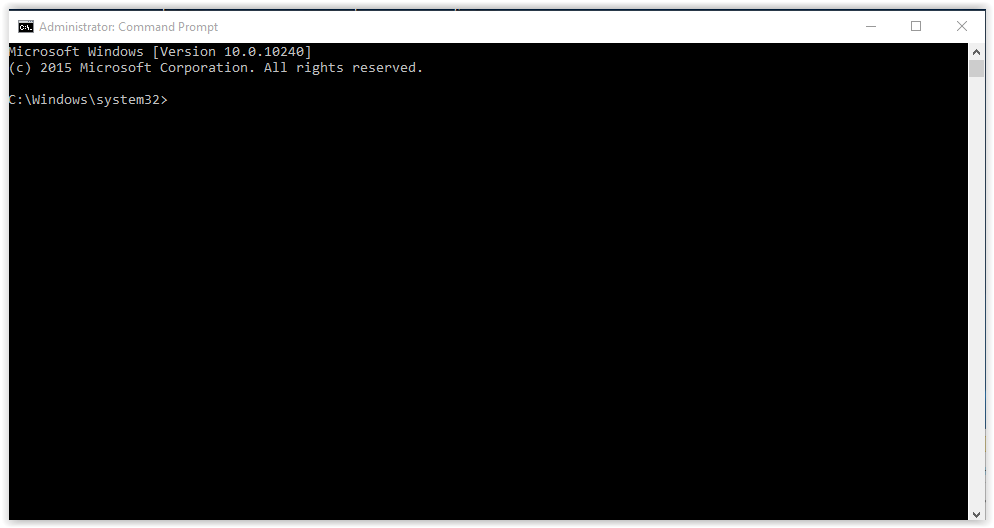
6. The Windows Prompt screen should now open.
Command Prompt window running with administrator privileges.


Windows 10 Enterprise: Manually Activating 


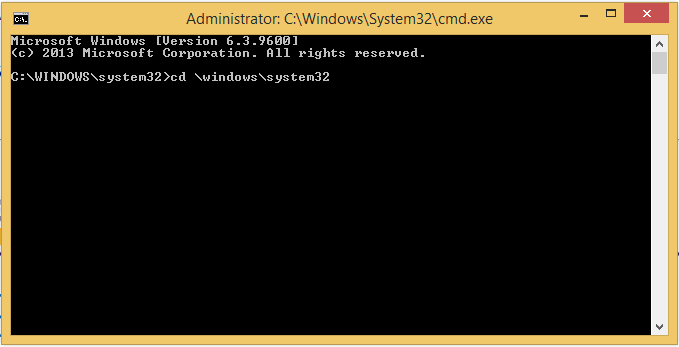
1. Type in “cd \windows\system32” then Press Enter.  (Only necessary if the command is not already in the Command Prompt.)
Entering cd \windows\system32 in the command prompt.

2. Type the cscript command (below) then press Enter:     (This should be done directly after "cd \windows\system32>".  If this is not in the prompt,)
  • cscript \windows\system32\slmgr.vbs /ato
(Please type in the command exactly as shown above, including the spaces.) 
typing script \windows\system32\slmgr.vbs /ato in the command prompt

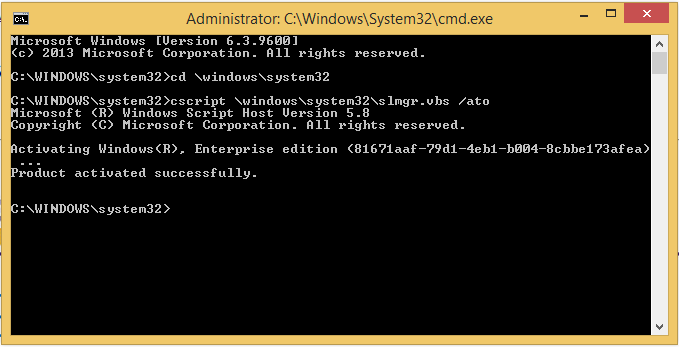
3. How to interpret the Output Message:
  • If the Output Message IS Product activated successfully:
    • The Product Activation Is Complete!
       
  • If the Output Message IS NOT Product activated successfully:
    • Make a Note of the Error Code or Output Message.
    • Use this document to resolve Common Error Codes:


Important Notes

Completing these steps outlined above WILL Activate your Microsoft Product for the time period as required in the Software License Agreement between LSU & Microsoft.  
Microsoft Requirements:
  • Windows 10 Enterprise REQUIRES Reactivation EVERY 180 Days.
     
  • Re-activation can occur AUTOMATICALLY and does when:
    • Your Computer is Connected to LSU Wi-Fi (Eduroam)
       - or - 
    • Your Computer is Connected to the LSU VPN

Sunday, January 27, 2019

Computer beep codes and their meanings

Computer POST and Beep code


Definition of: beep codes

Some number of short beeps that are sounded by the BIOS upon startup when a memory, cache or processor error is encountered. There are numerous beep code patterns, and Phoenix BIOS codes are long and short beeps delivered in groups. The following beep codes are for AMI BIOSs. There are additional beep codes for this BIOS not included here. See BIOS and POST card

1 Beep - Refresh Failure
Reset/replace memory, troubleshoot motherboard.

2 Beeps - Parity Error
Reset/replace memory, troubleshoot motherboard.

3 Beeps - Memory Error (first 64KB)
Reset/replace memory.

4 Beeps - Timer Failure
Troubleshoot motherboard.

5 Beeps - Processor Failure
Troubleshoot CPU, motherboard.

6 Beeps - Keyboard Controller Failure
Troubleshoot keyboard, motherboard.

7 Beeps - Virtual Mode Exception Error
Troubleshoot CPU, motherboard.

8 Beeps - Display Memory Failure
Troubleshoot graphics card, motherboard.

9 Beeps - ROM BIOS Checksum Failure
Replace ROM BIOS, troubleshoot motherboard.

10 Beeps - CMOS Shutdown Register Failure
Troubleshoot motherboard.

11 Beeps - L2 Cache Failure
Troubleshoot L2 cache, motherboard.

Continuous Beeps - Memory or Video Failure
Troubleshoot memory, graphics card, motherboard.


WINBIOS

The following are win BIOS Beep Codes that can occur.

BeepsError MessageDescriptionResolution
1Refresh FailureThe memory refresh circuitry is faulty.Reset the memory SIMMs. If the system still beeps, replace the memory.
2Parity ErrorParity error in the base memory (the first 64 KB block) of memory.Reset the memory SIMMs. If the system still beeps, replace the memory.
3Base 64 KB Memory FailureMemory failure in first 64 KB.Reset the memory SIMMs. If the system still beeps, replace the memory.
4Timer Not OperationalA memory failure in the first 64 KB of memory, or Timer 1 is not functioning.The motherboard must be replaced.
5Processor error 8042 - Gate A20 FailureThe CPU generated an error.The motherboard must be replaced.
68042 - Gate A20 Failure Processor Exception Interrupt ErrorCannot switch to protected mode.Try a different keyboard, or replace the keyboard fuse, if the keyboard has one.
7Processor Exception Interrupt ErrorThe CPU on the CPU Card generated an exception interrupt.The motherboard must be replaced.
8Display Memory Read/Write ErrorThe system video adapter is either missing or its memory is faulty. This is not a fatal error.There is a memory error on the video adapter. Replace the video adapter, or the RAM on the video adapter.
9ROM Checksum ErrorThe ROM checksum value does not match the value encoded in WINBIOS.The BIOS ROM chip is bad. The system probably needs a new BIOS ROM chip.
10CMOS Shutdown Register Read/Write ErrorThe shutdown register for CMOS RAM has failed.The motherboard must be replaced.
11Cache memory bad - do not enable cacheThe cache memory test failed. Cache memory is disabled. Do not press Ctrl/Alt/Shift <+> to enable cache memory.The motherboard must be replaced.


IBM BIOS

The following are IBM BIOS Beep Codes that can occur. However because of the wide variety of models shipping with this BIOS the beep codes may vary.

Beep CodeDescriptions
No BeepsNo Power, Loose Card, or Short.
1 Short BeepNormal POST, computer is ok.
2 Short BeepPOST error, review screen for error code.
Continuous BeepNo Power, Loose Card, or Short.
Repeating Short BeepNo Power, Loose Card, or Short.
One Long and one Short BeepMotherboard issue.
One Long and Two short BeepsVideo (Mono/CGA Display Circuitry) issue.
One Long and Three Short Beeps.Video (EGA) Display Circuitry.
Three Long BeepsKeyboard / Keyboard card error.
One Beep, Blank or Incorrect DisplayVideo Display Circuitry.

No Display or Black Screen on a computer monitor


Tip: If your monitor works when you first turn on your computer but then goes blank when Windows starts to load, see our page on how to resolve an issue related to distorted video after increasing resolution in windows.

  • Distorted video after increasing resolution in window :

If the video resolution has been set higher than what is supported by the monitor or video card, or the video card drivers currently installed are corrupt, you will get a distorted resolution. To recover the picture in Microsoft Windows, follow the steps below.

  • Shut down the computer. If your display is distorted and you're unable to properly shut down,turn off the computer.

    • Turn the computer on again and boot into Safe mode.
    • Once in Safe Mode, the resolution setting will be set at the lowest setting, allowing you to navigate through Windows.
    • Change the resolution back to a lower setting by clicking StartSettings, Control panel and click or double-click the Display icon.
    • In the Display Properties window, click the Settings tab and adjust the settings. If you are unsure what your original settings were, we recommend at least 800 x 600 with 256 colors or the lowest available setting.
    • After the settings have been changed, click Apply, close out of all windows and restart the computer.

    Tip: If you have a laptop, see our laptop screen is black page.


    My laptop screen is black

    Note: If you are having trouble with a monitor for a desktop computer, please see our page about no display or black screen on a computer monitor
    Follow the steps below to help diagnose the cause of a black or blank laptop computer screen.
    Tip: If you see a white screen or a rainbow of colors, this could mean the video card in the laptop is defective. In this case, the video card would need to be replaced by an authorized repair center for your brand of laptop.

    Computer is not booting

    Although you may not be able to see anything on the screen, listen to the laptop and make sure it sounds as if the computer is booting. If don't hear any sound, follow the steps in the link below before moving to the other sections on this page.

    Operating system issues

    If the computer boots up and displays a login screen for the operating system, but the screen goes black or blank after you log in, there may be an issue with the operating system. A system file may have become corrupted, preventing the operating system from loading and resulting in the black or blank screen.
    Try restarting the computer, to see if it is a temporary issue and resolves itself with a reboot. If the problem persists, erase your hard drive and reinstall window.

    Brightness is set low or power setting

    If the picture is partially visible, it is often the case that the laptop's brightness that is set low or is being turned down by a power setting. Make sure your laptop is not in a power saving mode by plugging the laptop into the wall. Next, try increasing the brightness on your laptop to verify that it is not the cause of your issue

    Try external display

    Verify there is not an issue with the laptop graphics card by connecting a monitor or other display to the laptop. If the external display works fine, it is an issue with your laptop display.
    If an external monitor is also not working with the laptop and you have read through the page linked above, the internal graphics card or cable is defective and not the display. You may need to have the graphics card or motherboard replaced. Take the laptop to a computer repair shop to see if it can be repaired.

    Laptop Overheating

    You can also check to see if the laptop is overheating. While a laptop typically shuts off when it overheats, it may only turn off the display by cutting power to the graphics chip (GPU).
    Tip: An issue with overheating may be due to debris build-up on the fan, heat sink or vents. You can try using canned air to blow out the dust and dirt.

    Another hardware issue

    If after following the steps above the laptop still has a black or blank screen, there is a hardware issue. The list below displays the most common hardware failures.
    1. Loose or disconnected cable
    2. Bad LCD power Inverter.
    3. Bad CCFL or Backlight.
    4. Bad LCD.
    If your laptop is under warranty, it is recommended you contact the laptop manufacturer for directions on how to get it repaired.
    If the laptop is not under warranty, unfortunately, for most end-users, repairing a bad LCD can be complicated or may result in further damage if not done properly. It is recommended that you take the laptop to a repair shop and have them replace the screen. However, if you want to try to switch out the LCD yourself, there a few companies that can send replacement screens for almost any laptop.

    Monitor is not on

    It may seem obvious, but make sure the monitor is turned on. If you do not see a power LED (blue, green, or orange light) on the front or bottom of the monitor, press the power button until it comes on. If no light comes on after several attempts, proceed to the next section.

    Computer is asleep

    If you stepped away from the computer for a bit and returned to a black screen, it is likely that the computer is asleep. Try moving your mouse, clicking the mouse buttons, or pressing any key (e.g., spacebar) to wake it up. If none of those actions work, press the power button.

    Loose or improper connections

    Tip: See our how to connect a monitor page for help with installing a new monitor.
    Check the data cable
    Ensure that your monitor's data transfer cable is properly connected to the computer. It should be completely inserted and firmly in place. Most new displays utilize a DVI or HDMI cable and port.
    Check the power cable
    If the data cable is plugged in, make sure the monitor is getting power by verifying that is a light (blue, green, or orange) on the front or bottom of the monitor's bezel.
    If you see no lights on the monitor, make sure it is connected to a working Wall outlet. If the power cord is removable from the back of the monitor, try replacing it with another power cable. If you still cannot turn on the monitor after trying another wall outlet and cable, the monitor is broken and should be replaced.
    Check the LED status
    If the monitor status light is orange or flashing, make sure the monitor is not in "suspend" mode, by moving the mouse or pressing a key on the keyboard. If this does not help, reconnect the data cable to the computer and back of the monitor, and then restart your computer.

    Try a different cable

    If your monitor is getting power, but you still don't see an image, the data cable may be the issue. Try using a different DVI, HDMI, or Display port cable with your monitor.

    Turn up the brightness and contrast

    If you're able to view your monitor's settings menu even though the screen is blank, it's likely that you need to turn up the brightness and contrast.

    No POST

    If the computer doesn't pass POST, it won't turn on and your monitor will remain black. If you hear beeping when you turn on your computer, run through the POST troubleshooting steps to determine the issue.

    Hardware Issue

    If you have followed the recommendations above and still have the same issue, your computer may have either a bad monitor, video card, or motherboard. The best method of determining this is to try the suggestions below.
    Borrow someone else's computer a computer monitor and connect it to your computer
    If another monitor works on your computer, it is safe to assume that your monitor is bad and should be replaced. While it may be possible to have the monitor serviced, it is often cheaper and easier to purchase a new one.
    Disconnect your monitor and connect it to another computer
    If your monitor works on another computer, it is possible that your video card is bad. Try removing video card from the affected computer and installing it in another computer. If it does not work in the other computer, the video card is most likely bad and needs to be replaced.
    If your monitor and video card work with another computer, your motherboard probably has an issue. You can attempt to troubleshoot motherboard problems using the link below. If you determine the motherboard is bad, or you cannot successfully run any tests, we suggest replacing the motherboard to fix the display problem.

    Friday, January 25, 2019

    HOW TO TROUBLESHOOT A PC POWER SUPPLY

    HOW TO TROUBLESHOOT A PC POWER SUPPLY


    When a PC suddenly goes on the fritz for no apparent reason, checking the PC power supply first may save a lot of time troubleshooting the system. A faulty PC power supply belies many intermittent computer problems. This is why experienced PC technicians often look first at the PSU when diagnosing PC hardware issues

    • System failures during the boot-up process.
    • The PC doesn’t power on at all
    • Spontaneous restarts or lockouts when trying to use the machine
    • Case fans and hard drives that do not spin
    • An overheating system due to heat sink and fan failure
    • Errors related to system memory
    • Recurring Blue Screen of Death (BSOD)

    The symptoms for caused pc power failure

    • Any power-on or system startup failures or lockups
    • Spontaneous rebooting or intermittent lockups during normal operation
    • Intermittent parity check or other memory-type errors
    • HDD and fan simultaneously failing to spin (no +12V)
    • Overheating due to fan failure
    • Small brownouts that cause the system to restart
    • Electric shocks that are felt when the case is touched

              Using a paper clip to test a power supply

    The paper clip test, alternatively called the jumper test, allows you to verify PSU functionality when it is disconnected from the components inside a PC. This test will identify some common issues:
    • Short circuits inside the power supply
    • Failed components
    • A live power connection
    First you want to turn the power switch at the rear of the power supply to the off position. (O should be ‘down’)
    Locate the 20+4P (24-pin) connector. Bend the paperclip and insert one end into the green pin (PS_ON) and the other into any of the black pins (Ground)

    Flip the switch at the rear of the PSU, and listen for the internal fan. If you can hear the fan, this should verify the power supply is turned on